

Spring 框架简介
2002年,首次推出了spring框架的雏形:interface21框架
spring框架以interface21为基础,经过重新设计,并不断丰富,于2004年3月24日发布了1.0正式版本
Spring 框架是一个 Java 平台,为开发 Java 应用程序提供全面的基础架构支持。 Spring 处理基础结构,因此您可以专注于应用程序。
spring理念:使现有技术更容易使用,本身是一个大杂烩,整合了现有的技术框架
Spring 使您能够从“普通的 Java 对象”(POJO)构建应用程序,并将企业服务非侵入性地应用于 POJO。此功能适用于 Java SE 编程模型以及全部和部分 Java EE。
从 Spring 平台中受益的示例:
- 使 Java 方法在数据库事务中执行,而不必处理事务 API。
- 使本地 Java 方法成为 HTTP 端点,而不必处理 Servlet API。
- 使本地 Java 方法成为消息处理程序,而不必处理 JMS API。
- 使本地 Java 方法成为 Management 操作,而不必处理 JMX API。
经典:
Spring IOC
Spring IoC 容器和 Bean 简介
ioc即控制反转
通过使用类的直接构造或诸如服务定位器模式之类的控件来控制其依赖项的实例化或位置的 bean 本身的逆过程(因此称为 Control Inversion)。
org.springframework.beans和org.springframework.context软件包是 Spring Framework 的 IoC 容器的基础。 BeanFactory接口提供了一种高级配置机制,能够 Management 任何类型的对象。 ApplicationContext是BeanFactory的子接口。它增加了:
- 与 Spring 的 AOP 功能轻松集成
- 消息资源处理(用于国际化)
- Event publication
- 特定于应用程序层的上下文,例如用于 Web 应用程序的WebApplicationContext。
简而言之,BeanFactory提供了配置框架和基本功能,而ApplicationContext添加了更多企业特定的功能。 ApplicationContext是BeanFactory的完整超集,在spring中,bean是由Spring容器实例化。
IOC: 对象由Spring来创建、管理、装配
容器概述
org.springframework.context.ApplicationContext接口代表 Spring IoC 容器,并负责实例化,配置和组装 Bean。容器通过读取配置元数据来获取有关要实例化,配置和组装哪些对象的指令。
ApplicationContext接口的实现

常用的
- ClassPathXmlApplicationContext
- FileSystemXmlApplicationContext
- AnnotationConfigApplicationContext
- =====
案例
创建项目
~
导包
        <dependency>
            <groupId>junit</groupId>
            <artifactId>junit</artifactId>
            <version>4.11</version>
            <scope>test</scope>
        </dependency>

        <!-- https://mvnrepository.com/artifact/org.projectlombok/lombok -->
        <dependency>
            <groupId>org.projectlombok</groupId>
            <artifactId>lombok</artifactId>
            <version>1.18.18</version>
            <scope>provided</scope>
        </dependency>

        <!--   一个一个导太麻烦,直接导入spring-webmvc包会将 aop、beans、context、core、web、webmvc等包一次导入    -->
        <!-- https://mvnrepository.com/artifact/org.springframework/spring-webmvc -->
        <dependency>
            <groupId>org.springframework</groupId>
            <artifactId>spring-webmvc</artifactId>
            <version>5.3.5</version>
        </dependency>
创建实体类
@Data
public class Users {
    private Integer id;
    private String name;
}
创建beans.xml配置文件
<?xml version="1.0" encoding="UTF-8"?>
<beans xmlns="http://www.springframework.org/schema/beans"
       xmlns:xsi="http://www.w3.org/2001/XMLSchema-instance"
       xsi:schemaLocation="http://www.springframework.org/schema/beans
        http://www.springframework.org/schema/beans/spring-beans.xsd">

    <!--
    以前创建对象: Users users = new Users();
    现在交由spring容器来为我们创建对象
    id:对象引用users class:要实例化的具体对象(全限定名)
    -->
    <bean id="users" class="com.qc.entity.Users">
        <!-- 初始化属性 property:变量名  value:值-->
        <property name="id" value="666"/>
        <property name="name" value="张三"/>
     </bean>

</beans>
测试类
    @Test
    public void testUsers(){
        //使用ClassPathXmlApplicationContext获得ApplicationContext对象
        ApplicationContext context = new ClassPathXmlApplicationContext("beans.xml");
        //用getBean()方法去取我们刚刚配置的实例化后的对象引用
        Users users = (Users) context.getBean("users");
        System.out.println(users);
    }
结果
Users(id=666, name=张三)
Spring创建对象的方式
无产构造
Spring 默认使用无参构造创建对象
在上面实体类加入无参构造在运行
@Data
public class Users {
    private Integer id;
    private String name;

    public Users(){
        System.out.println("无参构造");
    }
}
无参构造
Users(id=666, name=张三)
有参构造
有参构造有三种方式创建对象
- index:下标
- name:变量名
- type:类型
修改实体类
@Data
public class Users {
    private Integer id;
    private String name;

    public Users(Integer id, String name){
        this.id = id;
        this.name = name;
        System.out.println("有参构造");
    }

}
index
    <!--  可以不按顺序排列  -->
    <bean id="users" class="com.qc.entity.Users">
        <constructor-arg index="1" value="张三"/>
        <constructor-arg index="0" value="18"/>
    </bean>
name
    <bean id="users" class="com.qc.entity.Users">
        <constructor-arg name="id" value="18"/>
        <constructor-arg name="name" value="张三"/>
    </bean>
type(不推荐)
    <!--  使用type如果有两个参数都是同一个类型,就会容易导致问题,所以不建议使用  -->
    <bean id="users" class="com.qc.entity.Users">
        <constructor-arg type="java.lang.Integer" value="12"/>
        <constructor-arg type="java.lang.String" value="张三"/>
    </bean>
spring配置
别名 alias
    <!-- 为注册对象起个个性名称 -->
    <alias name="users" alias="biubiubiu"/>
用到时候可以直接使用个性别名
Users users = (Users) context.getBean("biubiubiu");
name也可以起别名 而且更高级,可以取多个别名
    <bean id="users" class="com.qc.entity.Users" name="biubiubiu,dadadd,sasasasasa">
        <constructor-arg type="java.lang.Integer" value="12"/>
        <constructor-arg type="java.lang.String" value="张三"/>
    </bean>
bean的配置
    <!--
	id:bean的唯一标识符,相当于对象名
	class:bean对象对应的全限定名,包+类名
	name:别名
    -->
    <bean id="users" class="com.qc.entity.Users">
        <!-- 初始化属性 property:变量名  value:值-->
        <property name="id" value="666"/>
        <property name="name" value="张三"/>
     </bean>
import
一般用户=于团队开发时,可以放置多个配置文件,导入合并为一个
Di 依赖注入
实体类
@Data
public class Student {
    private String name;
    private Address address;
    private String[] books;
    private List<String> hobbies;
    private Map<String, String> card;
    private Set<String> games;
    private String wife;
    private Properties info;
}
@Data
public class Address {
    private String address;
}
beans.xml
<?xml version="1.0" encoding="UTF-8"?>
<beans xmlns="http://www.springframework.org/schema/beans"
       xmlns:xsi="http://www.w3.org/2001/XMLSchema-instance"
       xsi:schemaLocation="http://www.springframework.org/schema/beans
        http://www.springframework.org/schema/beans/spring-beans.xsd">

    <bean id="address" class="com.qc.entity.Address">
        <property name="address" value="金戈"/>
    </bean>

    <bean id="student" class="com.qc.entity.Student">
        <!--  第一种 普通注入   -->
        <property name="name" value="大胖"/>

        <!--  第二种  bean注入    -->
        <property name="address" ref="address"/>

        <!--  第三种 数组注入   -->
        <property name="books">
            <array>
                <value>西游记</value>
                <value>钢铁是怎样炼成的</value>
                <value>红楼梦</value>
            </array>
        </property>
        <!--   list集合注入  -->
        <property name="hobbies">
            <list>
                <value>学习</value>
                <value>谈恋爱</value>
                <value>打篮球</value>
            </list>
        </property>

        <!--    map注入  -->
        <property name="card">
            <map>
                <entry key="身份证" value="454544343434343232"/>
                <entry key="银行卡" value="2521332453433132131"/>
            </map>
        </property>

        <!--    set注入    -->
        <property name="games">
            <set>
                <value>英雄联盟</value>
                <value>PUBG</value>
                <value>CSGO</value>
            </set>
        </property>

        <!--    null:空值注入    -->
<!--        <property name="wife" value=""/>-->
        <property name="wife">
            <null/>
        </property>

        <!--    properties注入    -->
        <property name="info">
            <props>
                <prop key="driver">驱动</prop>
                <prop key="url">url</prop>
                <prop key="username">username</prop>
                <prop key="password">password</prop>
            </props>
        </property>

     </bean>


</beans>
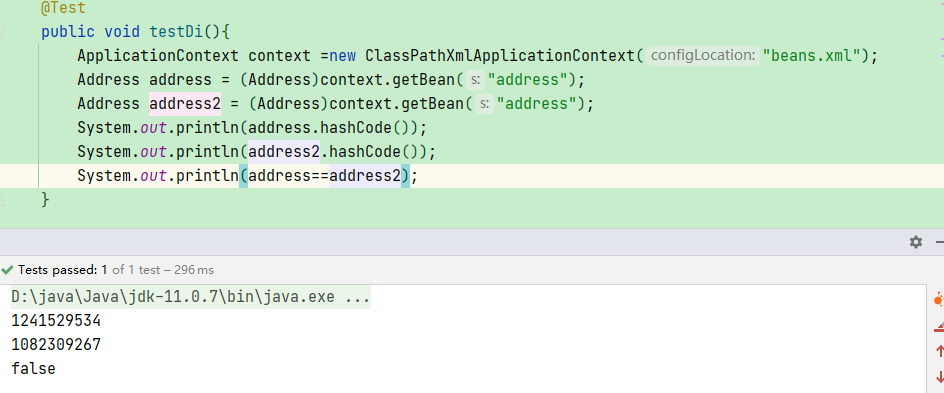
Test
public class SpringDiTest {

    @Test
    public void testDi(){
        ApplicationContext context =new ClassPathXmlApplicationContext("beans.xml");
        Student student = (Student)context.getBean("student");
        System.out.println(student);
    }

}
结果
Student(name=大胖, address=Address(address=金戈), books=[西游记, 钢铁是怎样炼成的, 红楼梦], hobbies=[学习, 谈恋爱, 打篮球], card={身份证=454544343434343232, 银行卡=2521332453433132131}, games=[英雄联盟, PUBG, CSGO], wife=null, info={password=password, driver=驱动, url=url, username=username})
扩展方式
p命名空间
    <!--
      p命名空间
      xmlns:p="http://www.springframework.org/schema/p"
      -->
    <bean id="address" class="com.qc.entity.Address" p:address="上海"/>
c命名空间
    <!--
       c命名空间:
       xmlns:c="http://www.springframework.org/schema/c"
       c命名空间通过有参构造创建对象,所以实体类必须有有参构造
      -->
        <bean id="address" class="com.qc.entity.Address" c:address="上海"/>
Bean作用域
| Scope | Description |
|---|---|
| singleton | (默认)将每个 Spring IoC 容器的单个 bean 定义范围限定为单个对象实例。 |
| prototype | 将单个 bean 定义的作用域限定为任意数量的对象实例。 |
| request | 将单个 bean 定义的范围限定为单个 HTTP 请求的生命周期。也就是说,每个 HTTP 请求都有一个在单个 bean 定义后面创建的 bean 实例。仅在可感知网络的 Spring ApplicationContext中有效。 |
| session | 将单个 bean 定义的范围限定为 HTTP Session的生命周期。仅在可感知网络的 Spring ApplicationContext上下文中有效。 |
| application | 将单个 bean 定义的范围限定为ServletContext的生命周期。仅在可感知网络的 Spring ApplicationContext上下文中有效。 |
| websocket | 将单个 bean 定义的范围限定为WebSocket的生命周期。仅在可感知网络的 Spring ApplicationContext上下文中有效。 |
singleton 单列模式
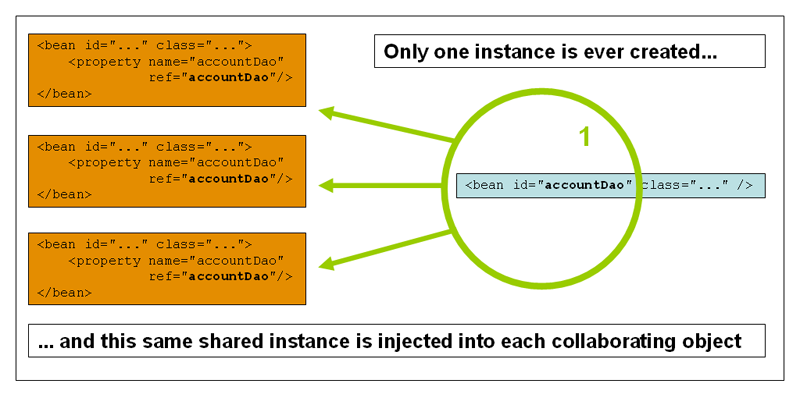
spring 默认就是单列模式
<bean id="address" class="com.qc.entity.Address" c:address="上海" scope="singleton"/>
prototype 原型模式
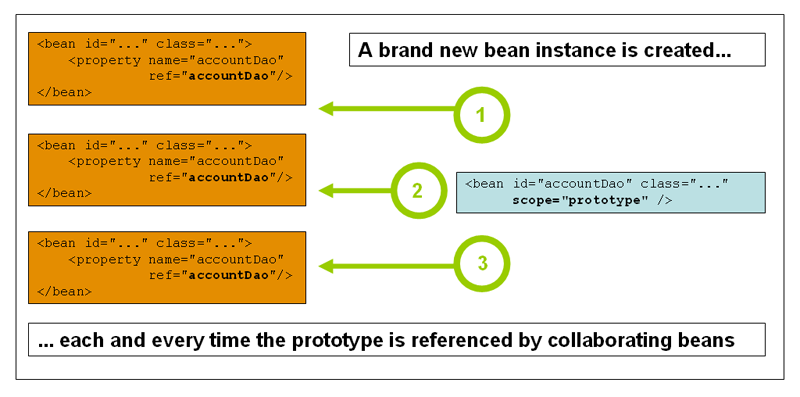
原型模式每一次getBean()都会产生一个新的对象
        <!--  将scope改为prototype  -->
        <bean id="address" class="com.qc.entity.Address" c:address="上海" scope="prototype"/>
Bean自动装配
byName
    <!--
     autowire:自动装配
     byName:全自动在容器上下文中查找,和自己对象set方法后面的值对应的 beanid
     -->
    <bean id="student" class="com.qc.entity.Student" autowire="byName">
byType
    <!--
     autowire:自动装配
     byType:全自动在容器上下文中查找,和自己对象属性类型相同的bean
     但是byType只适用于全局类型唯一,如果有多个同类类型就会报错,无法装配
     -->
    <bean id="student" class="com.qc.entity.Student" autowire="byType">
小结:
- byName的时候,需要保证所以bean的id唯一,并且这个bean需要和自动注入的属性set方法一致
- bytype的时候,需要保证所有bean的class的唯一,并且和要自动注入的属性的类型保持一致
注解自动装配
@Autowired
导入约束
导入context 约束
<?xml version="1.0" encoding="UTF-8"?>
<beans xmlns="http://www.springframework.org/schema/beans"
       xmlns:xsi="http://www.w3.org/2001/XMLSchema-instance"
       xmlns:context="http://www.springframework.org/schema/context"
       xsi:schemaLocation="http://www.springframework.org/schema/beans
        http://www.springframework.org/schema/beans/spring-beans.xsd
        http://www.springframework.org/schema/context
        http://www.springframework.org/schema/context/spring-context.xsd">
</beans>
配置注解的支持
    <!--  开启注解支持  -->
    <context:annotation-config/>
    <!--  配置bean  -->
    <bean id="address" class="com.qc.entity.Address">
        <constructor-arg name="address" value="上海"/>
    </bean>
使用@Autowired
在需要注入的属性上添加 @Autowired 注解
@Data
public class Student {
    private String name;
    @Autowired //加入Autowired注解
    private Address address;
    private String[] books;
    private List<String> hobbies;
    private Map<String, String> card;
    private Set<String> games;
    private String wife;
    private Properties info;
}
扩展

@Nullable:字段标记了这个注解,说明这个字段可以为null
    @Autowired(required = false)
    private Address address;
@Autowired(required = false) 一样表示这个字段可以为null
如果@Autowired自动装配的环境比较复杂,自动装配无法通过一个注解[@Autowired]完成的时候,我们可以使用@Qualifier(value=“xxx”)去配置@Autowired使用,来指定一个唯一的bean对象注入。
    <!--  配置多个bean -->
    <bean id="address" class="com.qc.entity.Address">
        <constructor-arg name="address" value="上海"/>
    </bean>
    <bean id="address2" class="com.qc.entity.Address">
        <constructor-arg name="address" value="北京"/>
    </bean>
    <bean id="address3" class="com.qc.entity.Address">
        <constructor-arg name="address" value="深圳"/>
    </bean>
	//使用 @Qualifier(value = "address3") 指定bean
    @Autowired(required = false)
    @Qualifier(value = "address3")
    private Address address;

@Resource
    @Resource
    private Address address;
@Resource 默认按照字段名称去查找
如果有多个bean,就指定nama
    @Resource(name = "address3")
    private Address address;
若果按名称找不到指定的bean时,就会按照类型进行装配。
- @Autowired与@Resource都可以用来装配bean. 都可以写在字段上,或写在setter方法上。
- @Autowired默认按类型装配(这个注解是属于spring的),默认情况下必须要求依赖对象必须存在,如果要允许null 值,可以设置它的required属性为false,如:@Autowired(required=false) ,如果我们想使用名称装配可以结合@Qualifier注解进行使用
- @Resource(这个注解属于J2EE的),默认安照名称进行装配,名称可以通过name属性进行指定,
如果没有指定name属性,当注解写在字段上时,默认取字段名进行按照名称查找,如果注解写在setter方法上默认取属性名进行装配。 当找不到与名称匹配的bean时才按照类型进行装配。但是需要注意的是,如果name属性一旦指定,就只会按照名称进行装配。
spring使用注解开发
spring-config.xml配置
<?xml version="1.0" encoding="UTF-8"?>
<beans xmlns="http://www.springframework.org/schema/beans"
       xmlns:xsi="http://www.w3.org/2001/XMLSchema-instance"
       xmlns:context="http://www.springframework.org/schema/context"
       xsi:schemaLocation="http://www.springframework.org/schema/beans
        http://www.springframework.org/schema/beans/spring-beans.xsd
        http://www.springframework.org/schema/context
        http://www.springframework.org/schema/context/spring-context.xsd">

    <!-- 导入context的约束 -->

    <!--  配置注解支持  -->
    <context:annotation-config/>

    <!--  扫描指定的包,包内的类使用了注解就会生效 -->
    <context:component-scan base-package="com.qc"/>

</beans>
bean的配置和属性的注入
@Component:在类上加入这个注,表示这个类被spring管理了,就是bean
@Component创建对象引用默认使类名首字母小写,可以传入值,指定名称:@Component(“s”)
@Value(“xx”):表示在属性上添加这个注解,注入值
@Component
@Setter
@Getter
@ToString
public class Users {

    //等价与<property name="name" value="小明"/>
    @Value("小明")
    private String name;
}
@Component的衍生注解
我们在web开发中会按照mvc三层架构来分成
- @Repository 持久层
- @Service 业务层
- @Controller 视图层
这四个注解都是一样的,都是将类注册到spring容器中,只是在开发中常这样用来分层
作用域
直接使用@Scope(“prototype”)
@Controller
//@Scope("singleton")
@Scope("prototype")
public class UserController {
}
@Configuration
spring还支持全部用java代码配置bean
@Configuration:表示这是一个配置类:等价与beans.xml
创建实体类
@Setter
@Getter
@ToString
public class Users {
    @Value("qc")
    private String name;
}
创建配置类
@Configuration
public class MyConfig {

    @Bean
    public Users users(){
        return new Users();
    }

}
Test
    @Test
    public void test(){
        //使用AnnotationConfigApplicationContext创建ApplicationContext对象
        ApplicationContext context = new AnnotationConfigApplicationContext(MyConfig.class);
        Users users = (Users)context.getBean("users");
        System.out.println(users);
    }
@Configration 使用说明:
- @Configration 注解作用在类、接口(包含注解)上
- @Configuration 用于定义配置类,可替换 xml 配置文件
- @Configration 注解类中可以声明一个或多个 @Bean 方法
- @Configration 注解作用的类不能是 final 类型
- 嵌套的 @Configration 类必须是 static 的
@Bean 使用说明:
- @Bean 注解作用在方法上
- @Bean 指示一个方法返回一个 Spring 容器管理的 Bean
- @Bean 方法名与返回类名一致,首字母小写
- @Bean 一般和 @Component 或者 @Configuration 一起使用
- @Bean 注解默认作用域为单例 singleton 作用域,可通过 @Scope(“prototype”) 设置为原型作用域
- 默认情况下 Bean 名称就是方法名
- @Bean 注解支持设置别名,比如:@Bean(“s”)
- @Bean 注解可以接受一个 String 数组设置多个别名,比如:@Bean({“user”,“s”,“z”})
代理模式
AOP
aop简介
AOP:Aspect Oriented Programming 面向切面编程,是Spring框架体系结构中重要的功能模块,在代码执行过程中,动态嵌入其他代码,通常使用在如日志、事务处理、异常处理等场景。
AOP把软件的功能模块分为两个部分:核心关注点和横切关注点。
好处:
- 集中处理某一关注点/横切逻辑
- 可以很方便的添加/删除关注点
- 侵入性少,增强代码可读性及可维护性
术语
| 术语 | 描述 |
|---|---|
| 切面(Aspect) | 切面泛指交叉业务逻辑。比如事务处理、日志处理就可以理解为切面。常用的切面有通知与顾问。实际就是对主业务逻辑的一种增强 |
| 织入 | 织入是指将切面代码插入到目标对象的过程 |
| 连接点 | 连接点指切面可以织入的位置 |
| 切入点 | 切入点指切面具体织入的位置 |
| 通知(Advice) | 通知是切面的一种实现,可以完成简单织入功能(织入功能就是在这里完成的)。通知定义了增强代码切入到目标代码的时间点,是目标方法执行之前执行,还是之后执行等。通知类型不同,切入时间不同 |
| 目标对象 | 被一个或者多个方面所通知的对象,这个对象永远是一个被代理对象。也称为被通知对象 |
| 织入 | 织入把方面连接到其它的应用程序类型或者对象上,并创建一个被通知的对象。这些可以在编译时,类加载时和运行时完成 |
通知类型
| 通知 | 描述 |
|---|---|
| 前置通知 | 在一个方法执行之前,执行通知 |
| 后置通知 | 在一个方法执行之后,不考虑其结果,执行通知 |
| 返回后通知 | 在一个方法执行之后,只有在方法成功完成时,才能执行通知 |
| 抛出异常后通知 | 在一个方法执行之后,只有在方法退出抛出异常时,才能执行通知 |
| 环绕通知 | 在建议方法调用之前和之后,执行通知 |
基于接口
| 通知 | 实现接口 |
|---|---|
| 前置通知 | MethodBeforeAdvice |
| 后置通知 | AfterReturningAdvice |
| 环绕通知 | MethodInterceptor |
| 异常通知 | ThrowsAdvice |
| 引入通知 | IntroductionInterceptor |
基于注解
| 通知 | 注解 |
|---|---|
| 前置通知 | @Before |
| 后置通知 | @After |
| 返回通知 | @AfterRunning |
| 环绕通知 | @Around |
| 异常通知 | @AfterThrowing |
AOP的三种实现
Spring api接口实现
导包
除了必要的aop包之外还需要导入 aspectjweaver 包
        <!-- https://mvnrepository.com/artifact/org.aspectj/aspectjweaver -->
        <dependency>
            <groupId>org.aspectj</groupId>
            <artifactId>aspectjweaver</artifactId>
            <version>1.9.6</version>
        </dependency>
service
//接口
public interface UserService {
    public void add();
    public void  del();
    public void update();
    public void all();
}

//实现类
public class UserServiceImpl implements UserService{

    @Override
    public void add() {
        System.out.println("增加用户");
    }

    @Override
    public void del() {
        System.out.println("删除用户");
    }

    @Override
    public void update() {
        System.out.println("修改用户信息");
    }

    @Override
    public void all() {
        System.out.println("查看用户");
    }
}
切面
//前置通知
public class BeforeLog implements MethodBeforeAdvice {
    @Override
    public void before(Method method, Object[] objects, Object o) throws Throwable {
        System.out.println("前置通知");
    }
}


//后置通知
public class AfterLog implements AfterReturningAdvice {
    @Override
    public void afterReturning(Object o, Method method, Object[] objects, Object o1) throws Throwable {
        System.out.println("这里是后置通知");
    }
}
config
<?xml version="1.0" encoding="UTF-8"?>
<beans xmlns="http://www.springframework.org/schema/beans"
       xmlns:xsi="http://www.w3.org/2001/XMLSchema-instance"
       xmlns:aop="http://www.springframework.org/schema/aop"
       xsi:schemaLocation="http://www.springframework.org/schema/beans
        http://www.springframework.org/schema/beans/spring-beans.xsd
        http://www.springframework.org/schema/aop
        http://www.springframework.org/schema/aop/spring-aop.xsd">

    <bean id="userService" class="com.qc.service.impl.UserServiceImpl"/>
    <bean id="before" class="com.qc.log.BeforeLog"/>
    <bean id="after" class="com.qc.log.AfterLog"/>

    <!-- 配置切入信息 -->
    <aop:config>
        <!--
        配置切入点
	aop:advisor:继承接口使用这个
         execution:表达式
         第一个*: 表示返回值的类型任意
         com.qc.service.impl.UserServiceImpl:AOP所切的服务的包名
         .*(..):这个类下的所有方法,括号中两个点表示任何参数
         -->
        <aop:pointcut id="pointcut" expression="execution(* com.qc.service.impl.UserServiceImpl.*(..))"/>

        <!-- 那个bean切入那个点 -->
        <aop:advisor advice-ref="before" pointcut-ref="pointcut"/>
        <aop:advisor advice-ref="after" pointcut-ref="pointcut"/>
    </aop:config>

</beans>
Test
   @Test
    public void test(){
        ApplicationContext context = new ClassPathXmlApplicationContext("spring-config.xml");
        UserService userService =context.getBean("userService", UserService.class);
        userService.all();
    }
}
前置环绕
查看用户
这里是后置环绕
自定义实现
自定义类
public class DiyPointCut {

    //自定义前置通知
    public void before(){
        System.out.println("前置通知");
    }

    //自定义后置通知
    public void after(){
        System.out.println("后置通知");
    }

}
config
<?xml version="1.0" encoding="UTF-8"?>
<beans xmlns="http://www.springframework.org/schema/beans"
       xmlns:xsi="http://www.w3.org/2001/XMLSchema-instance"
       xmlns:aop="http://www.springframework.org/schema/aop"
       xsi:schemaLocation="http://www.springframework.org/schema/beans
       http://www.springframework.org/schema/beans/spring-beans.xsd
       http://www.springframework.org/schema/aop
       http://www.springframework.org/schema/aop/spring-aop.xsd">

    <!-- 将bean注册到spring容器 -->
    <bean id="diy" class="com.qc.diy.DiyPointCut"/>
    <bean id="userService" class="com.qc.service.impl.UserServiceImpl"/>
    <bean id="afterLog" class="com.qc.log.AfterLog"/>
    <bean id="beforeLog" class="com.qc.log.BeforeLog"/>

    <aop:config>
        <aop:pointcut id="pointcut" expression="execution(* com.qc.service.impl.UserServiceImpl.*(..))"/>

        <!--aop:advisor:要放在aop:aspect的上面-->
        <aop:advisor advice-ref="beforeLog" pointcut-ref="pointcut"/>
        <aop:advisor advice-ref="afterLog" pointcut-ref="pointcut"/>

        <aop:aspect ref="diy">
            <!--
            aop:aspect:自定义类使用这个
            method:自定义类的方法
            pointcut-ref:切入已经配置的切点
            pointcut:直接配置切点
            -->
            <aop:before method="before" pointcut-ref="pointcut"/>
            <aop:after method="after" pointcut="execution(* com.qc.service.impl.UserServiceImpl.*(..))"/>
            <aop:around method="around" pointcut-ref="pointcut"/>
        </aop:aspect>

    </aop:config>

</beans>
test
    @Test
    public void test(){
        ApplicationContext context = new ClassPathXmlApplicationContext("spring-config.xml");
        UserService userService = context.getBean("userService",UserService.class);
        userService.addUser();
    }
注解的方式
切面
@Aspect:告诉spring这是一种个切面
** @Before():前置通知
** @After():后置通知
@Aspect
@Component
public class AnnoDiy {

    @Before("execution(* com.qc.service.impl.UserServiceImpl.*(..))")
    public void before(){
        System.out.println("前置通知");
    }

    @After("execution(* com.qc.service.impl.UserServiceImpl.*(..))")
    public void after(){
        System.out.println("后置通知");
    }
}
config类
@Configuration:告诉spring这是一个配置类,等价于spring-config.xml
@ComponentScan(“com.qc.service”):扫描这个包下的所有类,有spring的注解就加入到spring容器
@EnableAspectJAutoProxy:开启springaop,等价于配置文件:aop:aspectj-autoproxy/
@Configuration
@ComponentScan("com.qc")
@EnableAspectJAutoProxy
public class MySpringConfig {

}
test
    @Test
    public void testAnno(){
        ApplicationContext context = new AnnotationConfigApplicationContext(MySpringConfig.class);
        UserService userService = (UserService) context.getBean("userServiceImpl");
        userService.addUser();
    }
ProceedingJoinPoint
ProceedingJoinPoint是JoinPoint的子接口
JoinPointImpl和MethodInvocationProceedingJoinPoint实现了他们
通过JpointPoint对象可以获取到下面信息
- Object getTarget(); 返回目标对象,即被代理的对象
- Object[] getArgs(); 返回切入点的参数
- Signature getSignature(); 返回切入点的Signature
- String getKind(); 返回切入的类型,比如method-call,field-get等等,感觉不重要
- Object proceed() proceed方法就是用于启动目标方法执行的
    @Around("execution(* com.qc.service.impl.UserServiceImpl.deleteUser(..))")
    public Object around(ProceedingJoinPoint pip){
        System.out.println("这里是环绕通知");
        System.out.println(pip.getSignature().getName());
        Object result = null;
        try {
            //执行原有的方法 pip.getArgs()获取参数
            result = pip.proceed( pip.getArgs());
            System.out.println("之后的逻辑处理");
        } catch (Throwable throwable) {
            throwable.printStackTrace();
        }
        return result;
    }